Icon creation tutorial for macOS apps
For a long time Graphisoft’s Archicad had the same icon for different versions, making it difficult to visually distinguish which version a file was opened in.
To solve this annoying problem, in 2009 the macinteract team crafted our own icon set and made it publicly available – for a graphical history or as inspiration, please search for ‘icon’ on our knowledgebase.
In October 2024, Graphisoft finally provided their own offical icon set and instructions – they are available here.
This is a good solution, thus we will no longer need to provide our ours.
The below instructions are for anyone interested in still creating their own app icon, not just for Archicad…
How to create your own app icons
The below instructions are for anyone interested in creating their own icon.
copy the existing app logo from an apps bundle to your Desktop – e.g. for Archicad this is located in:
/Applications/GRAPHISOFT/Archicad 26/Archicad 26.app/Contents/Resources/Archicad.icns
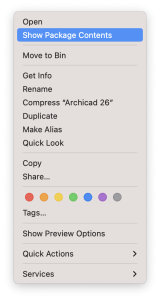
TIP > You get into the app bundle via right click on the app, then choosing to Show Package Contents,

CAUTION > Do not delete or modify anything in here, as it will break the app.
- open the .icns file in Apple Preview and save as TIFF 512×512, no compression including alpha;
- open this TIFF in Adobe Photoshop or Pixelmator to create your own design;
TIP > preserving transparency, e.g. for a see-through background…
PIXELMATOR ONLY > select each layer on choose to preserve transparency via cog wheel at bottom of layer list;
PHOTOSHOP ONLY > for transparency select transparent version then create alpha channel from selection > black becomes transparent;
- save your new app icon as TIFF with no layers and preserve transparency;
- convert app icons to .icns with an Icon Creator app, e.g. the free Image2icon app;
How to replace an app's icon with your own
- open the Applications folder in Finder;
- right-click the app for which you wish to change the icon for and choose to ‘Get Info’;.
- In Finder, find the new icon image you created or downloaded;
- Copy the new image either via right click or Command + C
- in the Get Info window, click on the current app icon in the top left to select it;
- paste the new icon via Command + V
TIP > If the icon on the dock hasn’t updated, simply remove the current entry / icon from dock and drag it in again.
macinteract Pty. Ltd. | ABN 44 155 154 653 | terms and legal. | © 2025