

macinteract Pty. Ltd. | ABN 44 155 154 653 | terms and legal. | © 2026
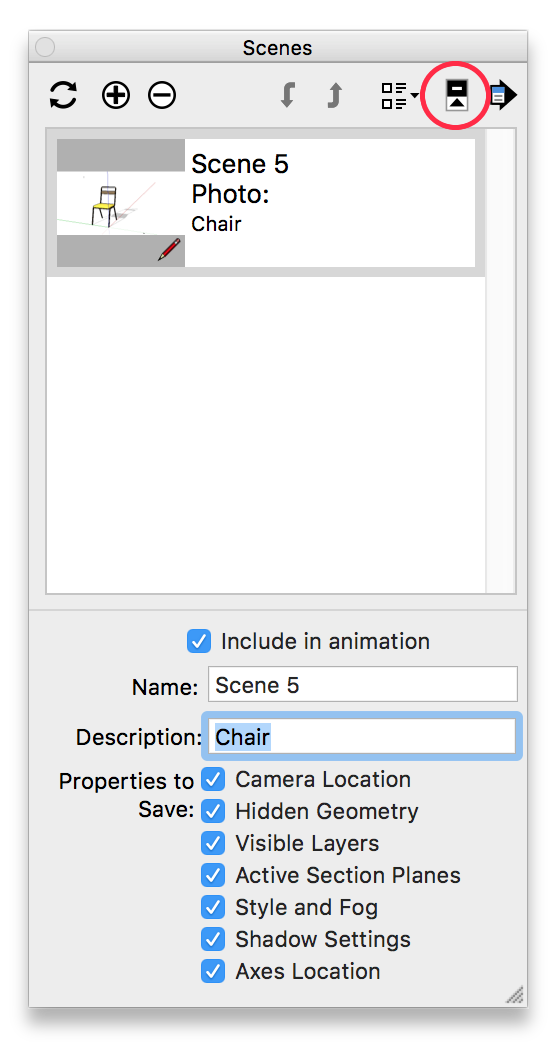
Scenes
A scene is a recorded set of view settings, that is automatically updated to reflect any changes to your model.
Where to find:
Window > Scenes
Use this to:
Save model display settings.
The obvious way to use scenes is to save specific camera angles. However a scene lets you store more than only the camera settings.
To show the details of a scene click the ‘detail’ button on the top right. Note the various options you can tick or un-tick.
You can use scenes to quickly access:
1. Camera locations (viewpoints)
2. Hidden Geometry
3. Visible Tags (Layers)
4. Sections
5. Styles
6. Shadows
7. Axes Location
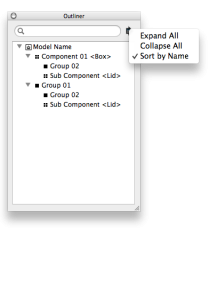
The Outliner is an often overlooked but important tool in organising your model, it displays exactly how your model is organised into groups and components. As you can see in the image below the organisational structure is completely open and, as mentioned before, can quickly get very complex.
Use this to:
Review model structure, Control visibility of Groups, Components & Section Planes, Rename Groups, Components & Section Planes.
Realise that:
1. different groups can have the same name even though they are completely unrelated. Component naming on the other hand must be unique. It is good to make a habit of naming your groups and components meaningfully to be able identify or search for them.
2. Components and groups can exist within components and groups. The Outliner lets you restructure via click and drag. For example you can drag “Group 01” or any of its sub-groups/components to be part of “Component 01”. This is a lot quicker than opening the group, selecting items, cutting, closing group, locating and opening the component, pasting into place!
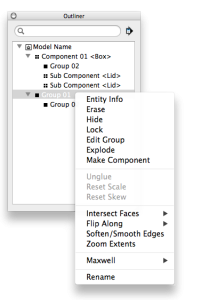
3. Access the context menu (via Right-click) for any item in the Outliner, to access an entire range of options (as can be seen in the image above)
Where to find:
Window > Outliner
INFO > The Outliner only shows groups, components & Section Planes and will not show any ungrouped geometry!
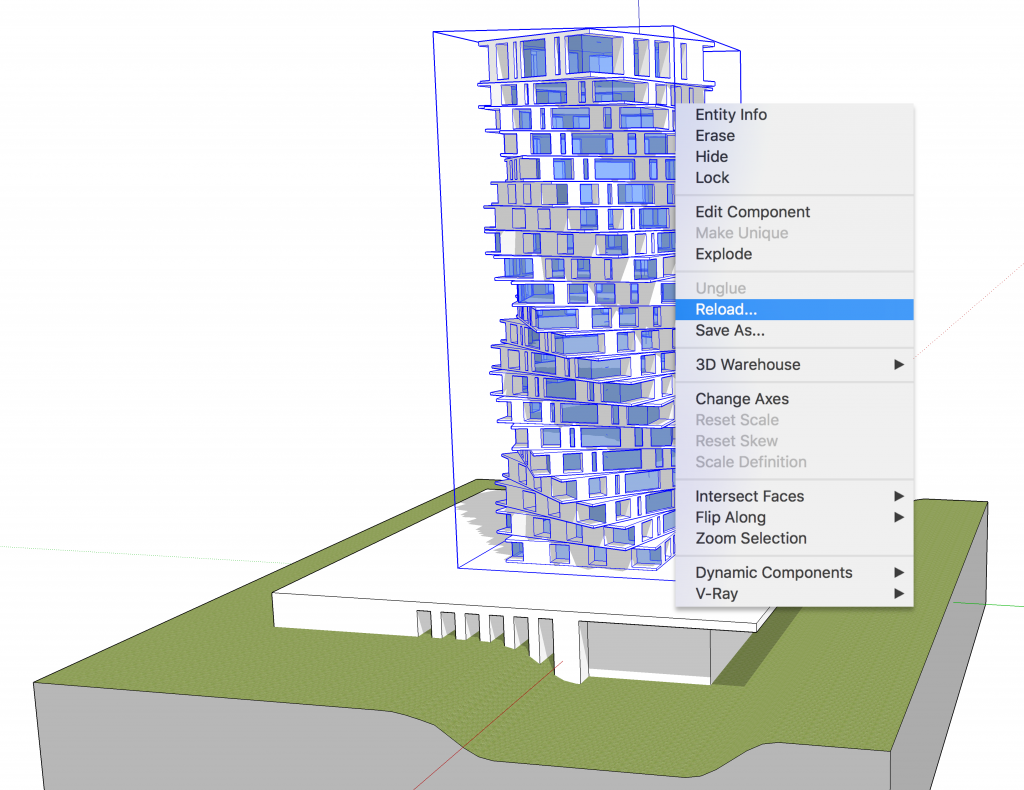
So far, there is no inbuilt teamwork function or model sharing between several people in SketchUp, however a workaround exists.
Components can be referenced between SKUP files. This allows people to work on separate files that get referenced into e.g. a main file.
Imagine you have a model of a large apartment building consisting of 3 elements: site, podium and tower. You can create a separate SketchUp file for each element (site model, podium model and tower model) and reference them all into a main file called for example Combined Model. As each file is a separate and unique file you can have a team of people working on each file simultaneously.
To import files into your Combined Model select File > Import > choose SketchUp file to import. Each SketchUp file you import becomes a Component.
To update an imported file, select entity, right-click the selection and choose Reload…
CAUTION > You will need to manually reload the component to see the changes that were done to the ‘imported’ file.
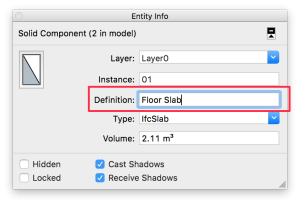
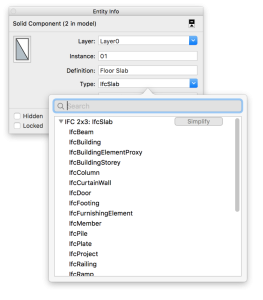
To classify objects means to embed data into Groups or Components in SketchUp. You can track and manage such data to:
1. Count, measure, dimension, and tag objects
2. Generate reports
3. Analyse your model: analyse a model for energy performance, cost, schedule,…
4. Export data into other programs: export IFC files for BIM modelling
Where to find:
Window>Entity info
The classification system is loaded with the Architectural Design Template alternatively you can import Classification Data through Window>Model Info>Classifications.
It is possible to create your own resources to be used with new projects in SketchUp as described below.
INFO > SketchUp stores your resources locally on your computer. In the following location you will find Template files, Materials Library and a Shortcuts file. You can copy this from one computer to another to speed up the deployment process.
Note the File path might depend on which version of SketchUp you have installed. On Apple macOS you will find it here:
/Users/your username/Library/Application Support/SketchUp 2017/SketchUp/…
Every SketchUp template contains a set of predefined settings for scene and units of measurement.
By default, the ‘Welcome to SketchUp’ dialog box will pop up when you open SketchUp, where you can select the right template for your design.
We recommend to start with the Architectural Design – Millimeters Template if you intend to use SketchUp for architectural projects.1. Start up a new SketchUp file,
2. Open Window>Model Info and set everything (or at the very least units) as desired, Close the Model Info window.
3. Set up shortcuts via File>Preferences>Shortcuts.
4. Select or set up Styles via Window>Styles>Edit. You can either use a standard that came with SketchUp or set up your own by clicking the + icon on the top right of the window. There are five icons underneath the Edit tab that you will need to click through and set up. Give the Style a name at the top of the Styles window.
Every time you change something to your style the icon on the top left will show two circular arrows chasing each other. Your style changes are only saved by clicking that icon!
5. Optional: Set up standard layers. Go Window>Layers and add layers via the + button.
6. Optional: Add Scenes to use for quick layer combinations.
7. Optional: include any modelled items that are frequently used, e.g. a person or elements that have your standard materials / colours assigned for easy pick-up and injection.
8. Go File>Save as Template. The template file is saved locally in your computer as per the file path above.
We will talk about the materials in the next section of this tutorial. For now just remember that you can create, edit and delete materials.
You can also create your own custom List of materials via the pull down menu at the bottom of the Material editor window. This will create a folder on your local disk at the file path given earlier. In this folder SketchUp will automatically save “.skm” files, one file for every custom material you add.
SketchUp will read this folder on startup for any changes.
macinteract Pty. Ltd. | ABN 44 155 154 653 | terms and legal. | © 2026
We use cookies to keep things running smoothly and help us improve—no secrets here!
Please select which cookies we can use. You can change your mind whenever you like!
Websites store cookies to enhance functionality and personalise your experience. You can manage your preferences, but blocking some cookies may impact site performance and services.
Essential cookies enable basic functions and are necessary for the proper function of the website.
These cookies are used for managing login functionality on this website.
Statistics cookies collect information anonymously. This information helps us understand how visitors use our website.
Google Analytics is a powerful tool that tracks and analyzes website traffic for informed marketing decisions.
Service URL: policies.google.com (opens in a new window)