macinteract Pty. Ltd. | ABN 44 155 154 653 | terms and legal. | © 2025
Every SketchUp template contains a set of predefined settings for scene and units of measurement.
By default, the ‘Welcome to SketchUp’ dialog box will pop up when you open SketchUp, where you can select the right template for your design.
We recommend to start with the Architectural Design – Millimeters Template if you intend to use SketchUp for architectural projects.Two types of files can be exported out of SketchUp:
1. Image files: SketchUp allows you to export Image files of various file types like JPEG, PNG, TIFF for raster images and PDF and 2. EPS for vector images.
CAD files: SketchUp allows you to export DWG and DXF files.
Setup and save your Scenes first, than select File>Export>2D Graphic and select the preferred file type to save and press Options… to set up specific export parameters.
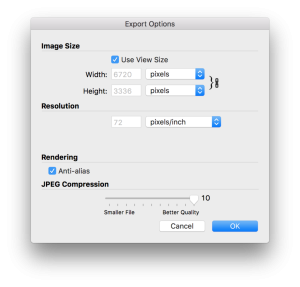
JPEG File type Export Options:
Resolution – higher resolution=higher quality image export
Rendering – Anti-alias creates smooth edges
JPEG Compression – higher compression=smaller file size=decrease image quality
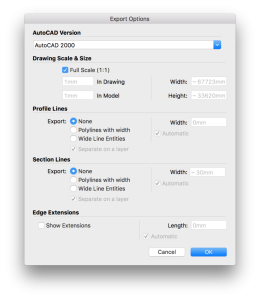
DWG File type Export Options:
AutoCAD Version – choose preferred AutoCAD release
Drawing Scale & Size – setup the scale for export
Profile Lines, Section Lines, Edge Extension – optional features, not really useful if you want to export a clean CAD file
It is possible to export your model into various 3d file types for major 3d platforms.
When exporting, remember that other 3D modelling software can’t read all SketchUp features.
To export a model select File > Export > 3D Model… and choose the preferred file type and respective export parameters.
TIP > You can export the model as IFC file for BIM data exchange if you spent some time classifying the objects.
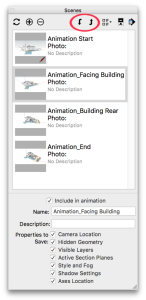
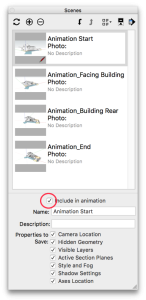
When your Scenes are set and in sequence you can export them as animation and save as a movie file.
Lets assume you have decided on your Scenes and now you want to create an Animation. The next steps are:
1. Move your Scenes up/down to get them into sequence:
2. Include only Scenes stored for animation:
3. Export Animation select File > Export > Animation and choose your preferred file format and export parameters….
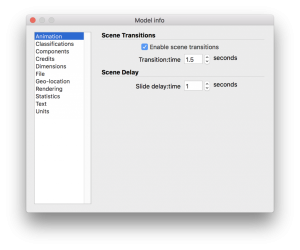
TIP > To adjust scene delay and transition time go to Window > Model Info>Animation dialog.
macinteract Pty. Ltd. | ABN 44 155 154 653 | terms and legal. | © 2025
We use cookies to keep things running smoothly and help us improve—no secrets here!
Please select which cookies we can use. You can change your mind whenever you like!
Websites store cookies to enhance functionality and personalise your experience. You can manage your preferences, but blocking some cookies may impact site performance and services.
Essential cookies enable basic functions and are necessary for the proper function of the website.
These cookies are used for managing login functionality on this website.
Statistics cookies collect information anonymously. This information helps us understand how visitors use our website.
Google Analytics is a powerful tool that tracks and analyzes website traffic for informed marketing decisions.
Service URL: policies.google.com