D2
Import

Importing Files

SketchUp lets you import various file types. Ranging from Image files and 2D CAD files to complex 3D models.

In this tutorial we will cover only a few features for importing Image files and 2D CAD files.

To import a file select  File > Import…

1.Image files: Can be imported as an Image, as a Texture or as a Matched Photo.

a. As Image – the image will be imported as an object

b. As texture – the image will be mapped on selected surface as a texture

c. As New Matched Photo – will switch your model into Match Photo mode with the selected image as a background

2. AutoCAD files: Import parameters are:

Units – Select the same drawing units as embedded in import file.

Preserve drawing origin – keep checked to locate the imported geometry at the same origin as set in software you were exporting from, this is handy when you need to update imported geometry later on.

Merge coplanar – SketchUp removes triangulated lines from faces.

Orient faces consistently – SketchUp orients faces of imported geometry in uniform direction

3. Sketchup Files: Reference External SketchUp files into your model as mentioned in the Teamwork chapter of this tutorial. Every referenced Sketchup file becomes a composite that can be updated/re-loaded when the original source file changes.


3D Warehouse

3D Warehouse is a website, containing thousands of free SketchUp models as well as manufacturers content.

You can download any SketchUp model from 3D Warehouse and insert it into your model.

Where to find:

Click on 3D Warehouse icon or select Window > 3D Warehouse.

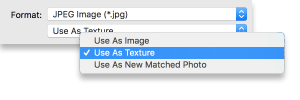
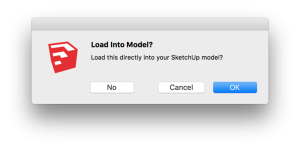
Select a model you like and hit Download, pop-up window will appear with options whether you want to import the model into your current SketchUp model or whether you want to download the file and save it to your computer (choose No for this option).


Importing CAD Files – Workflow Example

When importing CAD drawings as a basis for your 3D SketchUp model, make sure to follow these steps:

1. Prepare your CAD file before exporting from 3rd-party software -> delete or hide non required elements and locate elements on respective layers, delete unused layers and save file with correct units.

2. Set SketchUp units to the same units as the imported file (i.e. feet or decimal), if this has not been done already via your Template select Window>Model Info>Units to change.

3. Position the imported file or select Preserve drawing origin to place it at the exact same location as in the 3rd-party software. (This becomes handy once you need to update an imported CAD file, as all new entities will be placed into the exact same location).

4. Clean up Layers of the imported model: Create a new Tag (Layer) and name it i.e. CAD, set it as current tag (Layer) and delete all imported new Layers – a pop-up window will appear – choose Move to Current Tag (Layer) option and all imported CAD entities will move to the Current layer = CAD layer. Once you move CAD file entities don’t forget to switch Untagged (Layer0) back to Current Tag (Layer).

5. Group all imported elements.

6. Lock grouped elements: Edit>Lock to avoid any unwanted interference in feature modelling, use CAD elements only for tracing or for inferencing.


© 2021 macinteract pty. ltd. abn 44 155 154 653. terms and legal.