
macinteract Pty. Ltd. | ABN 44 155 154 653 | terms and legal. | © 2026
By default, the ‘Welcome to SketchUp’ dialog box will pop up when you open SketchUp, where you can select the right template for your design.
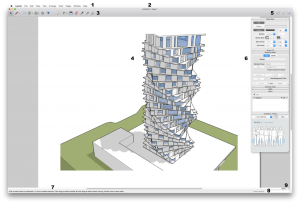
We recommend to start with the Architectural Design – Millimeters Template if you intend to use SketchUp for architectural projects.SketchUp LayOut is designed to document and present your SketchUp model.
Although a separate app, LayOut is synchronised with SketchUp PRO so anytime you update your model in SketchUp the LayOut presentation is automatically updated too.
When your model is finished or ready for presentation: set your Scenes, save your file and select the Send to LayOut icon in Getting Started Toolbar on top of the screen or go File>Send to LayOut.
The SketchUp LayOut window will automatically open, prompting you to select a Template in the Getting Started dialog box. Select a preferred layout and press Choose…
8 minutes 52 seconds
video by @SketchUp
macinteract Pty. Ltd. | ABN 44 155 154 653 | terms and legal. | © 2026
We use cookies to keep things running smoothly and help us improve—no secrets here!
Please select which cookies we can use. You can change your mind whenever you like!
Websites store cookies to enhance functionality and personalise your experience. You can manage your preferences, but blocking some cookies may impact site performance and services.
Essential cookies enable basic functions and are necessary for the proper function of the website.
These cookies are used for managing login functionality on this website.
Statistics cookies collect information anonymously. This information helps us understand how visitors use our website.
Google Analytics is a powerful tool that tracks and analyzes website traffic for informed marketing decisions.
Service URL: policies.google.com (opens in a new window)