macinteract Pty. Ltd. | ABN 44 155 154 653 | terms and legal. | © 2026
The importance of drawing accurately is often overlooked in the immediacy of the situation. Don’t think, get it done, print and go.
The big headache comes afterwards when someone will have to spend more time fixing what could have been done right in the first place – which is easy!
Where to find: Individual Grid Element via Toolbox or complete Grid System via Design>Grid System.
Use this to: Snap to, lock coordinates to or generate guide lines from.
The grid will most likely be the most accurate thing in your drawing. Set it up correctly and then lock it (Edit>Locking>Lock) and its layer. Every building element will relate to this grid.
INFO > The Grid System is more cumbersome to edit once placed (i.e. you have to select it in group-mode and edit via Design>Grid System or it will break into individual grid elements.
Also it is only useful if you have a strictly orthogonal or strictly radial grid. Therefore, although slightly more work because you have to name elements individually and slightly more subjective to drawing inaccuracies because you can place, rotate, etc them however you like, individual Grid Elements are preferred over the Grid System.
When you are done setting them up, group (COMMAND + G) and lock (Edit>Locking>Lock) to ensure nobody edits them by accident.
TIP > For Elevations and Sections you can control the vertical Display range of each Grid Line from within the Grid Settings window.
Where to find: Next to your cursor as soon as you start drawing. Select specific values to edit by using shortcuts: x,y,z (=coordinates) ,a (=angle),r (=radius),d (=distance). Lock / Unlock specific values by pressing these shortcuts in combination with the Option key.
TIP > If you use the shortcuts you do not need to use the SHIFT key to constrain the direction, i.e. you need to only type the letter and the amount. No ‘=’ is required, e.g. for ‘to origin’ you can only input ‘x0y0’.
Enter numerical values whenever you can.
Check values when you draw, snap or use guides.
INFO > The tracker tends to disappear. Set up a shortcut to turn it on again.
TIP > In combination with snapping you can enter a numerical value followed by + or – to respectively add to or subtract from the current value. E.g. “2500+” will add 2500 to the current value.
There are three different categories of snapping:
1. Snapping to existing elements.
It is not possible to turn this off.
Use this to:
1.1 Snap to points
1.2 Snap to perpendicular
1.3 Snap to tangents
1.4 Snap to intersections
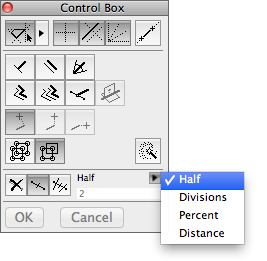
2. Special Snap Points.
It is possible to turn these on or off. You can control these settings in the Control Box. You can choose from Half (i.e. midpoint), Divisions, Percentage or Distance.
3. Grid Snap.
You can turn this off, and you should make sure it is off, via View>Grid Snap. Ensure it is un-ticked.
The reasons to leave this switched off are:
3.1 It is unlikely to coincide with your actual grid system and
3.2 It prevents you from snapping to building elements.
Where to find: Built in.
Use this to:
1. Snap to points
2. Snap to perpendicular
3. Snap to tangents
4. Snap to intersections
Watch out for: Multiplying mistakes, e.g. drawing relative to elements that are not accurately drawn. Use the tracker to check!
Where to find: Bottom of plan window.
Use this for:
1. Set out
2. Dimensioning
3. Referencing
Watch out for: Reset to default orientation when placing Markers & Tags, otherwise they do not rotate properly:
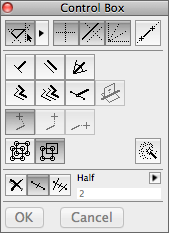
Where to find: Control Box for specific settings and turning these on or off.
Guide lines automatically pop up when hovering on edges of elements or to predefined angles. You can also place guide lines manually from the context menu (right click) after you have drawn the first point of an element.
Use this to: Draw or place relative to existing elements and find intersections between separate elements.
Watch out for: Multiplying mistakes, e.g. drawing relative to elements that are not drawn accurately. Use the tracker to check!
TIP > Clean up guidelines : right click context menu -> Remove all guide lines.
Where to find: OPTION + x,y,z,a,r or d
Use this to: Lock x, y, z coordinates, angle (a), radius (r) or distance (d).
Coordinates you lock to can either be entered manually in the Tracker and then locked ( if necessary) or locked to the current position of the cursor.
To enter specific coordinates you can either use Tab to scroll through the available options or type x to enter x-coordinates, y for y-coordinates, etc.
Watch out for: Multiplying mistakes, e.g. drawing relative to elements that are not accurately drawn. Use the tracker to check!
Where to find: Holding the SHIFT-button when drawing.
Use this to: constrain to x or y axis, constrain to highlighted guideline
INFO > In the Control you can also force Perpendicular, Parallel and Angle Bisector constraints.
Use this to: Zoom in to an element. Snapping has a default sensitivity of 5 pixels around the cursor. The more elements that are in those 5 pixels, the more likely you will snap to the wrong one.
Use either Magic Prefs with Magic Mouse (an app that lets you customise how your Magic Mouse reacts to input) or a non Apple Mouse.
Where to find: F3, OPTION + F3, F4
Use this to: Always review in 3D what you draw in plan view.
What looks good in plan can be the wrong colour, material, detail, size and/or base height (i.e. the height to its home story) in every other view.
Use this to: Pick up obvious mistakes regarding line weight assignment.
Use Hairline to easily identify nodes and edges in order to draw accurately.
TIP > Generally it is a good idea to keep this switched off. Your drawing will update faster and it will be easier to snap.
Where to find: Part of your Template file.
Use this to: Avoid team members setting up their own individual standards (also refer Chapter “Office Standards.”).
What to avoid:
Trusting the magic wand.
The magic wand will pick up and multiply any existing mistakes. It might also pick up more (connected off screen elements) than you think.
Using the Magic Wand to place a slab into a room can (1). pick up additional nodes which will show up as vertical lines in the slab in elevation and (2). only reach to the inside face of the wall…
Trusting drawn elements to be accurate.
Other people might not be as excellent at drafting as you are.
Fix it later.
Fix mistakes immediately. That way you avoid mistakes multiplying and becoming an issue when there is no time to fix them.
Drawing polygon when you want rectangular.
E.g. L-shaped slabs will be quicker and more accurate when drawn as a rectangle followed by subtracting the rectangle part you don’t need.
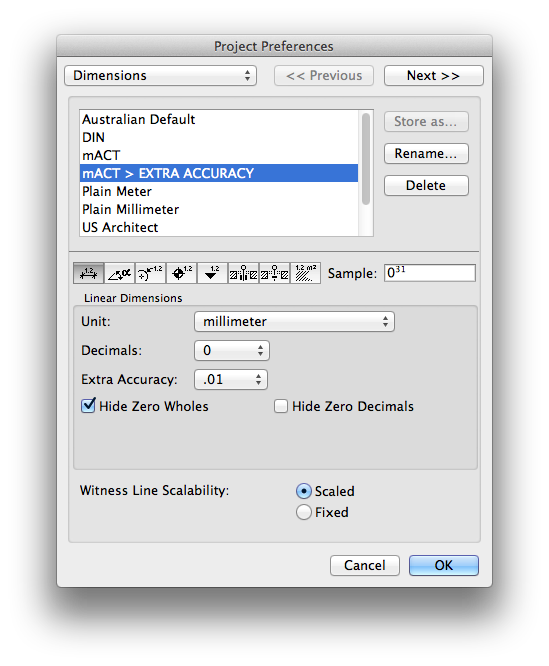
Where to find: Options>Project Preferences>Dimensions.
Options>Project Preferences>Calculation Units & Rules.
Use this to: Set up dimension accuracy schemes.
They will be part of your Saved Views and you can change current schemes via the Quick Options palette. Make sure to use “Store as…” after changing settings for linear, angular and other dimensions.
TIP > You can for example set up a scheme with very high accuracy (with 2 decimal places in Dimensions) for modelling vs. a standard accuracy scheme (no decimal places) to be used on printed drawings.
macinteract Pty. Ltd. | ABN 44 155 154 653 | terms and legal. | © 2026
We use cookies to keep things running smoothly and help us improve—no secrets here!
Please select which cookies we can use. You can change your mind whenever you like!
Websites store cookies to enhance functionality and personalise your experience. You can manage your preferences, but blocking some cookies may impact site performance and services.
Essential cookies enable basic functions and are necessary for the proper function of the website.
These cookies are used for managing login functionality on this website.
Statistics cookies collect information anonymously. This information helps us understand how visitors use our website.
Google Analytics is a powerful tool that tracks and analyzes website traffic for informed marketing decisions.
Service URL: policies.google.com (opens in a new window)