
macinteract Pty. Ltd. | ABN 44 155 154 653 | terms and legal. | © 2026
Pros: The fail-safe way to make sure you are looking at and working on the right drawing.
Views can be generated automatically with the “clone a folder” button. For example, you can clone the entire Stories folder, and as it is a clone it will reflect changes being made to the original (e.g. by adding a story). This saves time vs setting every drawing up separately.
Cons: This map contains only views that were saved from (automatic or manual) the project map.
Also does not indicate which view is currently active.
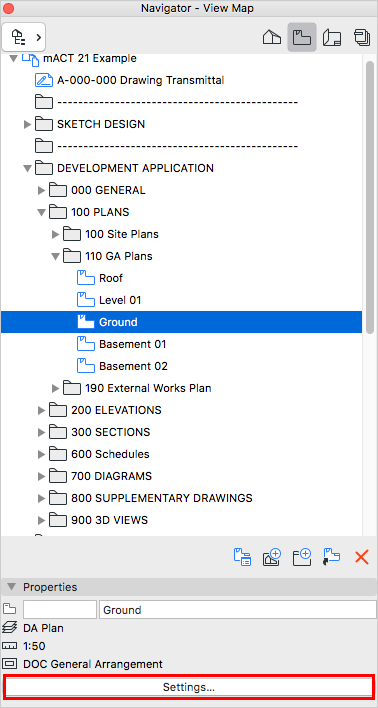
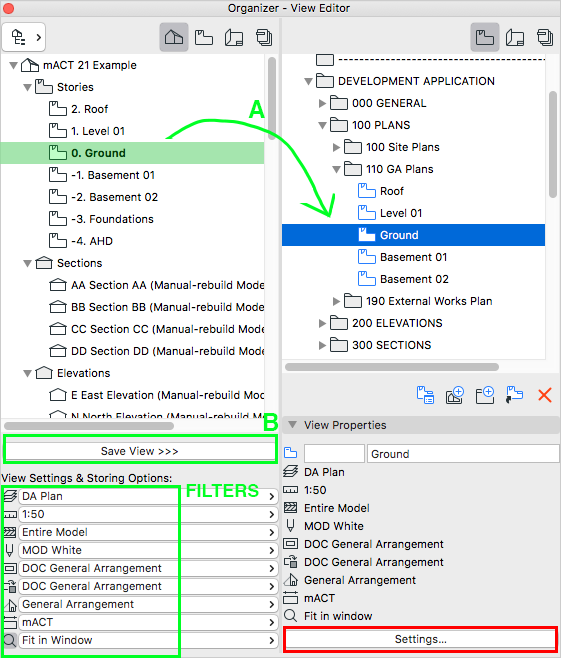
TIP > Organise the view map in folders relating to a drawing set, e.g. general arrangement or sections:
1. Drag and Drop View in Organiser
or
2. Save View via the Save View Button
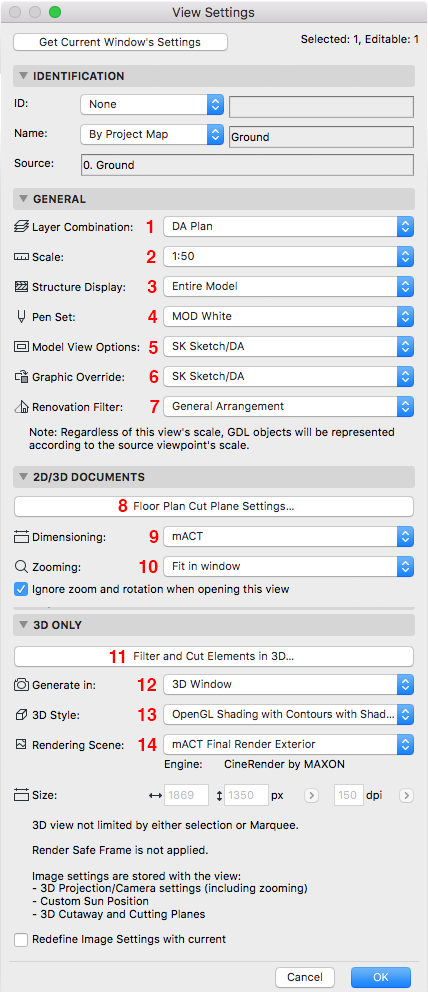
Note that a View is always saved with Filters (View Settings & Storing Options) applied to the viewpoint.
You can save as many copies of viewpoints you like with different filters applied for various project stages or drawings. If you decide to modify the View Settings, open the Settings dialog and change the filter to your requirements (click on the arrows next to a particular filter).
Where to find:
Command + L
Layer Combinations are listed on the left panel of the Layer Settings Dialog Box; individual Layers are listed on the right
Use this to:
Create and adjust layers and layer combinations.
Set up Layer combinations as relevant to the drawing types you need to produce. E.g. Structural, General Arrangement, Site Plan, etc..
Assuming you have set up and are using a template file this wouldn’t require more attention. Sometimes adjustments or a quick check are necessary however, especially to Layer Priorities. As you know, Layer Combinations save a state of all Layers in your file in regards to visibility, locking and priority. Check that a strategy for the naming of Layers is in place so that Layers are grouped by purpose (e.g. Structure or Landscaping or…) and easy to find. Check that per Layer Combinations being used apply the correct state for every layer and the combinations are named and grouped by name clearly and logically.
Check that the strategy for Layer Priorities allows for some flexibility but is not overly complex. A few dedicated numbers (of say 0 to 5) should be sufficient at design stages and a more comprehensive set of numbers can be set for construction stages if necessary.
By Layer in a selected Layer Combination you can define and control the following layer settings:
1. Lock / unlock
If you want the layer locked.
Useful for essential layers like boundary or grid so they cannot be edited accidentally. Also useful if you don’t want the layer to appear in the layer list for selected elements or tools. You’ll need to enable this in Work Environment>Dialogue Boxes and Palettes>Hide Locked Layers in Pop Up Palettes.
2. Visible / hidden
Visibility on your drawings.
3. Solid / wireframe display (useful only for intense 3D models)
This option can be useful in order to clarify a 3D perspective (giving wireframe context but not obscuring the elements that are solid. This setting has no effect on plan, section or elevation.
4. Intersection priority (only elements on equal priority numbered layers will connect & a higher priority number has priority over the lower number.)
Layer combinations are an essential part in Saved Views and thus in your ability to control what is visible on a layout. If no Layer Combination is set when saving a view Archicad will remember the current state and will call it “custom”. Avoid this at all cost as keeping track of which drawing has which layers (in) visible /(un)locked / priority will be nearly impossible and certainly more will cost more time and effort then it should.
Workflow:
1. Select a layer combination to be edited.
2. Adjust layers as required on the right side of the Layer Settings window.
3. Save the changes by clicking Update before moving on to the next layer combination!
TIP > You can base a new Layer Combination on an existing one by selecting the existing before clicking New.
TIP > Make sure layers and combinations are set up as part of your template.
macinteract Pty. Ltd. | ABN 44 155 154 653 | terms and legal. | © 2026
We use cookies to keep things running smoothly and help us improve—no secrets here!
Please select which cookies we can use. You can change your mind whenever you like!
Websites store cookies to enhance functionality and personalise your experience. You can manage your preferences, but blocking some cookies may impact site performance and services.
Essential cookies enable basic functions and are necessary for the proper function of the website.
These cookies are used for managing login functionality on this website.
Statistics cookies collect information anonymously. This information helps us understand how visitors use our website.
Google Analytics is a powerful tool that tracks and analyzes website traffic for informed marketing decisions.
Service URL: policies.google.com (opens in a new window)